A worm composting bin, known as a vermicomposter, can be fairly inexpensive and easy to maintain. There are several ways to vermicompost. Below are instructions on how to build one kind of worm composting bin designed to be used inside. It is also possible to purchase worm composting bins. You will want to put your bin in an indoor space as you do not want the worms to freeze in the winter or get too warm in the summer. Additionally, you may want to put the bin in a basement or other out-of-the-way space since you will be producing compost and worm “tea” in the composter.
Here are the supplies you need:
3. Screen material – window screens, but not metal, because it can rust. Put the small squares of screen over the holes because you don't want your worms to escape!
4. Waterproof glue – To keep the screens in place, even after they get wet.
5. Shredded paper – Enough to fill your bin three inches deep and extra to add each time you feed the worms once a week. Almost any kind of paper works, but avoid heavy, shiny paper and colored paper.
6. A little bit of dirt – A pound will be enough. Just make sure it does not have harmful chemicals in it. If all goes well, the worms will be producing their own dirt (compost) soon.
7. A little bit of water – Some water is needed to moisten the paper and dirt to create a comfortable medium for the worms to thrive. Soak the paper and then drain it before using.
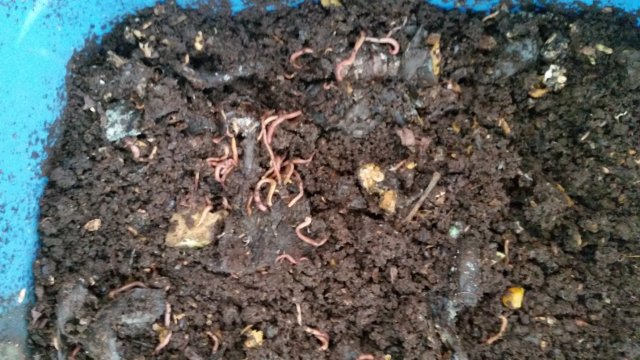 8. Worms – A pound of red wrigglers are recommended because they consume waste quickly, but earthworms also work. Red wrigglers are available online, from your U.S. Department of Agriculture (USDA) extension office or from another worm bin owner. And don't forget that worm bins produce more worms as well as great compost.
9. A trowel – To move the compost as needed in the bin.
10. Food scraps container – Use a small container with a tightly fitting top to collect vegetable and fruit scraps. Why not just put the food straight into the worm bin? Worms do best left alone, so it is best to feed them only once a week. Use the food scraps container to collect scraps for a week and then feed the worms weekly.
When you are looking for totes of all sizes and colors, check out Edge Plastics. This woman-owned, made-in-America company offers private labeling on all products and a unique color palette for customers to choose from. Their products can be found at large retailers throughout the United States and Canada.
Here are the supplies you need:
1. Two plastic bins – one must be taller and rest inside the other, shorter bin. The top tub should have a top to keep the worms from finding their way outside the box. It also needs to be somewhat flexible so you can drill holes into it. An 18 gallon tub that is roughly 15 inches deep, 20 inches wide and 15 inches tall works well.
2. A drill – To drill the holes so the worms can breathe. Drill a 1-inch hole about two inches from the top of the taller bin on one side. Drill another hole on the opposite side. Drill four 1/8-inch holes near the bottom near the corners of the bin. Don't drill holes in the smaller bin.
2. A drill – To drill the holes so the worms can breathe. Drill a 1-inch hole about two inches from the top of the taller bin on one side. Drill another hole on the opposite side. Drill four 1/8-inch holes near the bottom near the corners of the bin. Don't drill holes in the smaller bin.
3. Screen material – window screens, but not metal, because it can rust. Put the small squares of screen over the holes because you don't want your worms to escape!
4. Waterproof glue – To keep the screens in place, even after they get wet.
5. Shredded paper – Enough to fill your bin three inches deep and extra to add each time you feed the worms once a week. Almost any kind of paper works, but avoid heavy, shiny paper and colored paper.
6. A little bit of dirt – A pound will be enough. Just make sure it does not have harmful chemicals in it. If all goes well, the worms will be producing their own dirt (compost) soon.
7. A little bit of water – Some water is needed to moisten the paper and dirt to create a comfortable medium for the worms to thrive. Soak the paper and then drain it before using.
8. Worms – A pound of red wrigglers are recommended because they consume waste quickly, but earthworms also work. Red wrigglers are available online, from your U.S. Department of Agriculture (USDA) extension office or from another worm bin owner. And don't forget that worm bins produce more worms as well as great compost.9. A trowel – To move the compost as needed in the bin.
10. Food scraps container – Use a small container with a tightly fitting top to collect vegetable and fruit scraps. Why not just put the food straight into the worm bin? Worms do best left alone, so it is best to feed them only once a week. Use the food scraps container to collect scraps for a week and then feed the worms weekly.
Now, add the damp paper and soil to the taller, inside bin. Fill it about 3 inches deep and add your worms. Let them acclimate for a day or so before feeding them scraps. When feeding them, use scraps like fruit and vegetables, coffee grounds, bread, cereal and even tea bags. Throw in a small handful of shredded paper. Add all the food scraps on top of the paper. Then cover ALL of the food scraps with dirt and moist paper. Exposed food attracts fruit flies, but covered food scraps don’t. Add dirt and moist paper to the bin until the worms have made enough compost to use to cover the food scraps. Don't add animal products like bones, dairy, meat and the like.
Before long, you'll have happy worms and compost ready for your plants!
When you are looking for totes of all sizes and colors, check out Edge Plastics. This woman-owned, made-in-America company offers private labeling on all products and a unique color palette for customers to choose from. Their products can be found at large retailers throughout the United States and Canada.
Comments
Post a Comment